_____Stu's___Dungeon__
Joyful Honda
Treasure
Lesson Room Cabs
In the beginning
2
3 4 5
6 7 8
9
10 11
12 13 14
15
Jointer1
Jointer2
Router
Table1
Router Table 2
The Doors
Do
Pa
Give Me A Brake
Cyclone
Cyclone 2
Cyclone
3
Cyclone 4
Liquor
Shop Reno Tenjinsama Shrine Tree Tour
Beer Shelves
Wine Shelves
Five Cuts
Drill Press <NEW
DoPa 2007 <NEW
Turning
Jean Francious Escoulen
Eli Avisera Demo Day One
Eli Avisera Day Two
Lathe Stand!!
Turning
Roughing
It
Sharpening Station
Bowl Blank Processing
Captured Hollowing Rig
<NEW
Logging In Tokyo
Woodlot Woodlot
2006 Woodlot
3 Woodlot 4
Chainsaw Mill
Chainsaw
Mill Mk II
WORKSHOP PAGE TWO
More stuff done in the
Workshop!
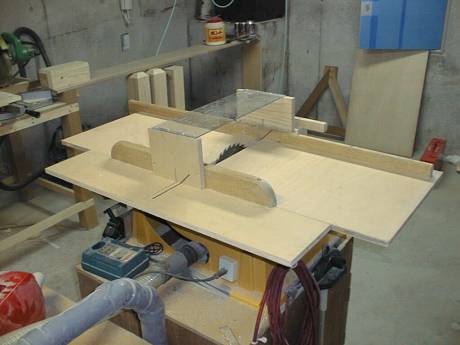
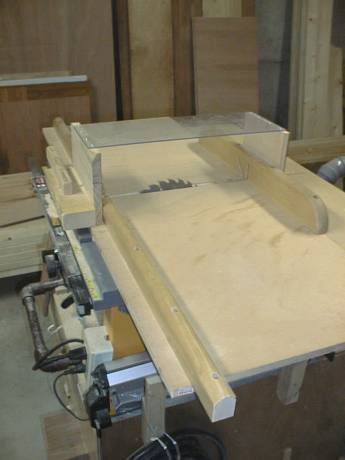 View of the cut-off sled I just made, works so well, I wonder how I ever got along with out one! |
 This is the 1st attempt, so it is a bit rough. I will use this one to make cuts with the blade tiled, and I'll make another one for straight cuts, and probably another for angled cuts! |
 A view from the bottom of the stairs into the shop |
 You can see my homemade dust collector here, it works, but it don't work great. |
 Rear view of the cut-off sled |
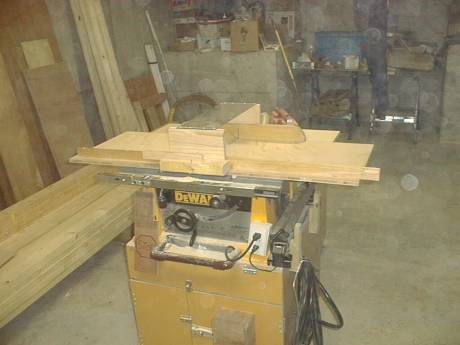 Front view |
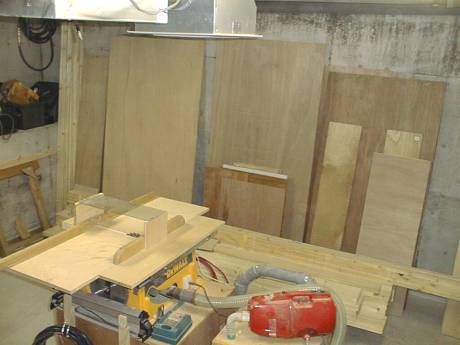 I need to make a lumber rack of some sort |
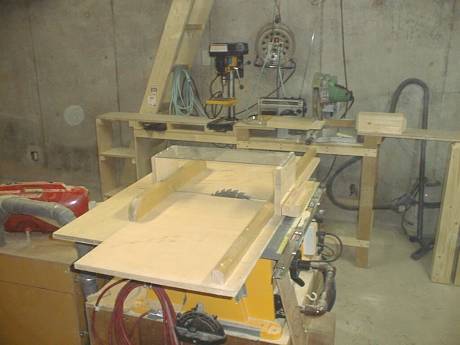
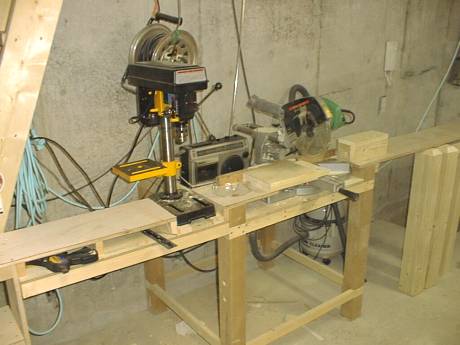 I've got my CMS and my mini DP in a line on one bench I've built. seems to work fine |
| Update October 1st! | |
 Brand spanking new! |
 even have a good push on/off switch that I can use somewhere. |
 Rather basic once you get into it. |
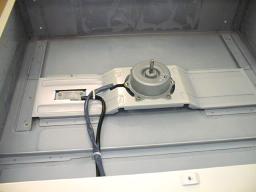 That little motor is is rated at 50 watts or 0.067 hp :) |
|
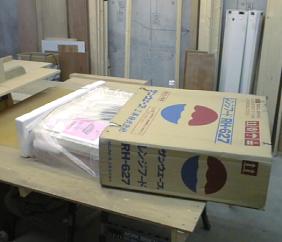
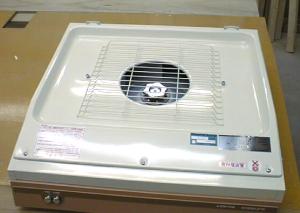
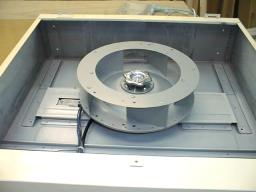
The Story of Two Fans Well, I am in need of some kind of air cleaner for my shop, I know how harmful this stuff is for your health, all that fine dust, plus I hate wiping it off of everything. I needed a fan of some kind, I was out a the recycle shop, looking for a desk for my eldest daughter (she wants one real bad, and the workshop in not set up yet) and I found these kitchen vent hoods for about $20. Brand new, never been used. I opened the boxes myself. I even got a 6 month warranty from the recycle shop. They are rated at 590 cubic meters per hour, quick bit of math, and that is 20832.9 cubic feet per hour divided by 60 minutes is 347.4 cubic feet a minute. I noticed that the Grizzly basic air cleaner is 510 CFM, so it is not that high, but I did buy two of them. One other advantage is that they are very flat, and will fit up tight against the ceiling. I won't be using the stock steel cabinets that they came in, too many leaks, and I want to make them more compact. I have the mind to make kind of a mini cyclone with one, I wonder if it would work? The CFM one a portable DC is about 350, but the static pressure is 2.76, on the Grizzly item, and I really doubt that the kitchen fan is anywhere near that. I should just break down and buy a proper motor for the cyclone and go from there. I have been looking for a fan to make an air cleaner from an AC shop etc. for over a year, no go. You see, the squirrel cage fans here in the AC units are about a 3" diameter and about 2' long, not of much use. We don't have central heating, so those types of furnace fans are not common. I figure that for $20 a piece they were worth it. |
|
 Testing, yes they work! |
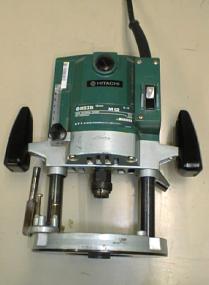 Big Time Router Gloat! Now this is a real gloat. A Hitachi M12 router, everything works great, not too old, picked it up for $50! It is missing all of the accessories, but I can get what I need. I have a Hitachi M8, that will be for hand held stuff, this I will build into a router table. there is also a straight cut carbide tipped bit with it, 1/2" shank, about 1 1/2" cutting surface, a bit rusty, but should clean up OK. It is about a 3/4" bit. That, here in Japan, is worth well over what I paid for the router. I also got a 6 month warranty on this item. |
 |
 |
| The Toolbox
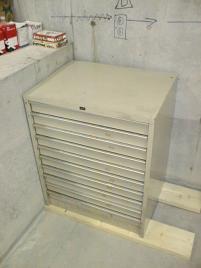
Gloat If you painted this unit read and put a Snap-On logo on it how much would it cost? This is a set of drawers designed to be filled with paper, like at an art supply shop, or a printing shop. It is very heavy duty. the steel is of a heavy gauge, it should work well as a tool box. I have the idea to put it on a mobile base, and to put a wooden top on it that extends out a few inches on all sides. I might even put a tail vice on it, and some dog holes, it would make a very good mobile work surface. the drawers are about 3" in depth, which is perfect for hand tools, no more digging through drawers, everything can be laid out where you can see it. I will line the bottoms of the drawers with that black toolbox drawer liner stuff. Oh, BTW, I picked this up for about $40. Should be good! |
|
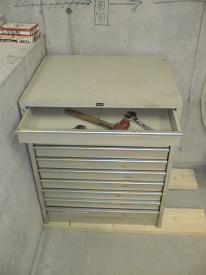
| Update
Oct 3rd!
I got busy and put the toolbox on wheels and built a top for it. The top is made out of 2 x 4s ripped in half, and raised up on 3 x 3s. This should give me a good solid work surface to clamp things on . I figure that the whole box will weigh a bit when full, so it should be on wheels so I can move it around to places I'm working. It is a bit tall, so I may go for some shorter wheels, we'll see.
|
|
Last Gloat In the background of this picture you can see two sets of fluorescent twin tube lights leaning against the wall. You guys may find them cheap at the big box stores, well they are not cheap here. I found lights like this at an electrical wholesaler, and they were about $100 a pop! At our version of a big box store they were about $50 a pop, (made in China) this is without tubes or starters. Well I got these at the same recycle shop for about $15 a piece, and they had the tubes and starters included. They were brand new, well almost, used once in a trade show for one week. Right now I have eighteen 40 W fluorescent lights in my shop for a total of 720 W of light, with the addition of these lights eight x 40W = 340 I'll have 1040 W of light in a 24' x 14' shop, now that should do it! |
|
Itsy Bitsy Can
of beer The one on the left is 135 ml of beer or 4.57 ounces. When only a taste is needed! |
|
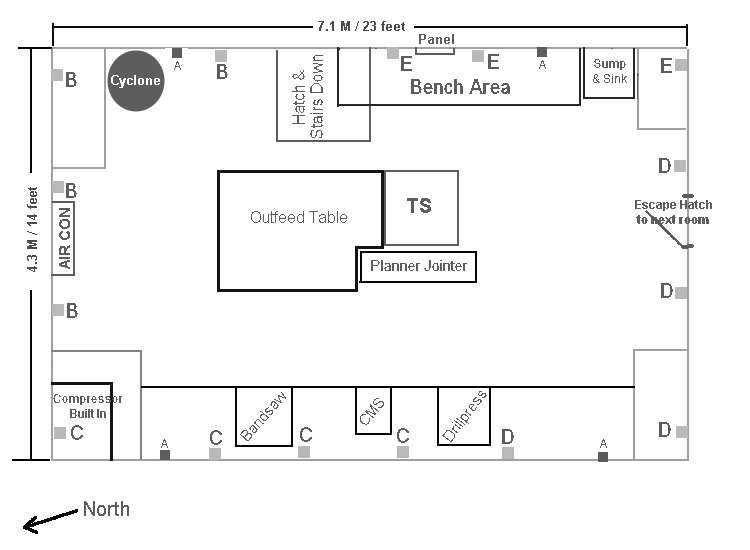 Here is a very crude drawing of my workshop layout. The electrical panel is in the East wall near the ceiling just South of the hatch. The square or rectangular things you see in the corners are the concrete "benches" I have around the workshop. Look through the pages and you'll understand. The black squares with an "A" are the four existing outlets, they are 1' off the ground and I will move them up to bench height. The gray squares with the various letters on them are where I plan to put the rest of the outlets. I figure that too many outlets is better than too few. I want to make four circuits of 4 outlets each. Now here is the question, should they be side by side "B B B B" or should they be somewhat staggered around "B C D E" or maybe " B C B C" and "D E D E " The Air Con and two ceiling lights are on a separate panel from outside the workshop, because I am a little short on power and I wanted there to be some lights on if I blow the breaker in the shop. It will be more work to stagger the outlet layout, but I wonder if it would be worthwhile to do so. I want to get my walls up soon, I have all of the studs and I will screw and glue them to the walls, but I want to run my electrical first. I will then insulate and put the wall board up. on that subject I have not decided, I can get plywood for almost the same price as drywall, the plywood would be tough and I could hang anything anywhere. For the Table saw "TS" I will run a line under the floor, I will also put in a line for the planner and jointer, as I will put them alongside the TS when I get them The CMS is on the west wall in a tool line with a Bandsaw Drill Press and whatever else I am missing. Below the panel on the East wall I'll put my main bench and cabinets. At the foot of the stairs in the corner I plan on putting a cyclone, this is not too close to the tools, but it is close to where i have to go to dump the sawdust bin. The max distance from the cyclone to a tool will be only about 5 meters, not far at all. I plan on steel spiral pipe, no need to fool around with anything else. I've got loads more questions, this is just a primer.
Cheers! |
|
| July 2002 Update!! | |
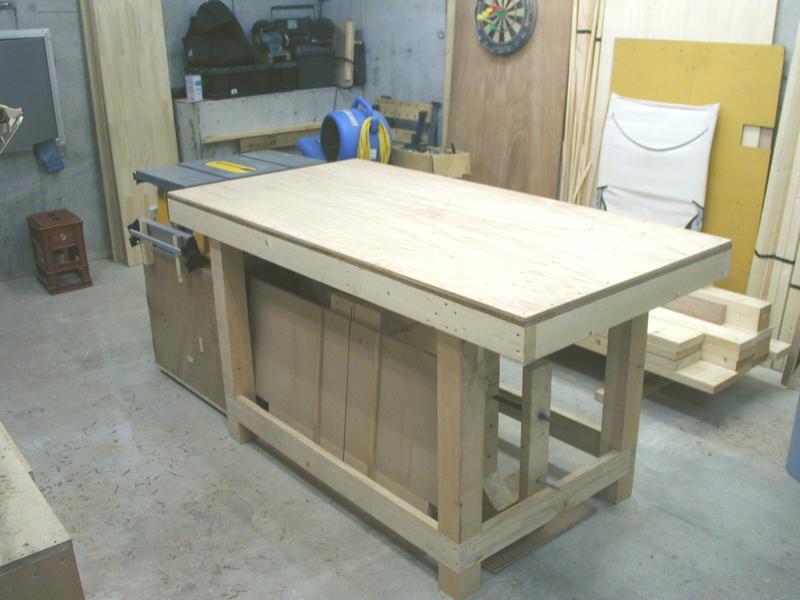 I finally got around to making a proper out feed table/work bench |
 It lines up about 1/16" below the table saw top, it is 180 cm x 90 cm, and 95 cm tall. The top is mad of two 9 mm thick pieces of plywood screwed and glued together, the legs are 4 x 4s and the rails are 2 x 4s. It is a good solid table. |
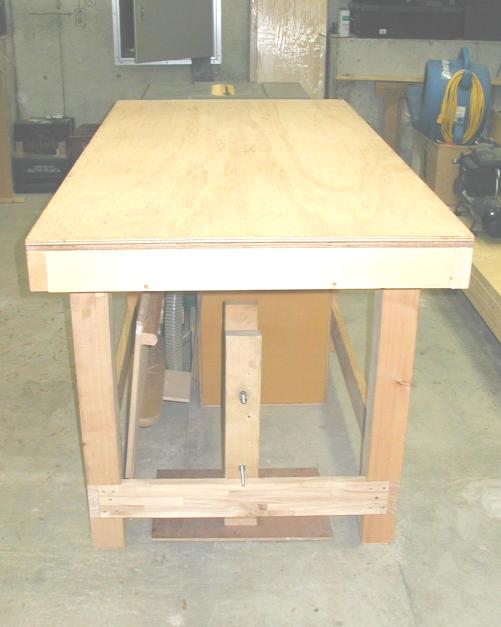
 A view from the table saw end, wow look at all the junk piled in the corner!! |
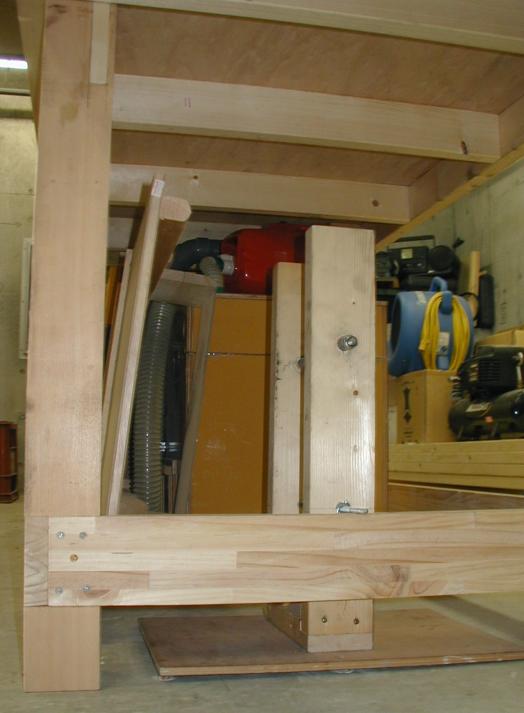 A look underneath. I was able to fit my dust collector for the table saw here too. |

Well that's it for now, I have to get back to my work, work.
|
|
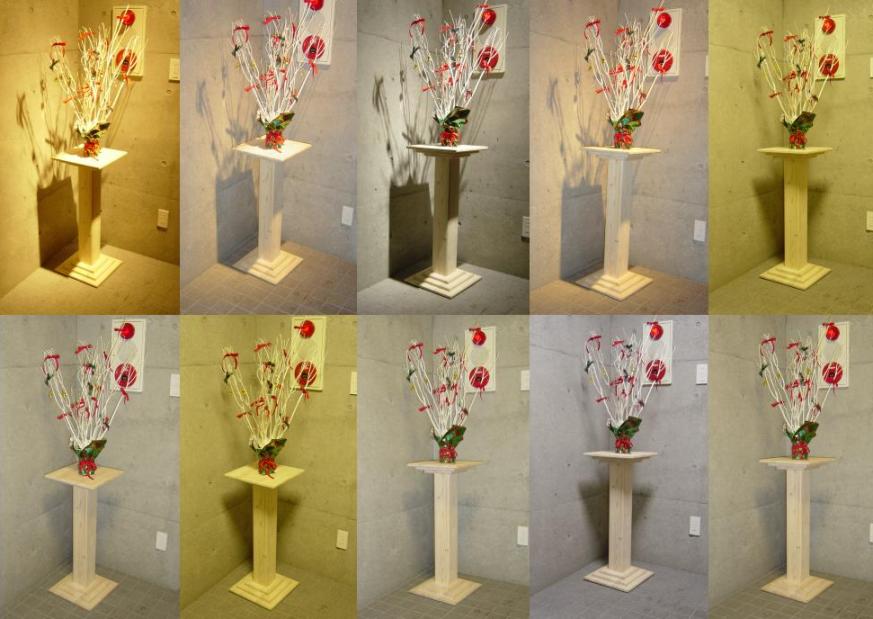
My wife made this Christmas arrangement and needed something to put it on. I made this pedestal stand for her. The stand and the arrangement sits in our building entrance. Kind of neat what you can do with the various lighting (halogen and fluorescent) and the various settings on the digital camera. Cheers! |
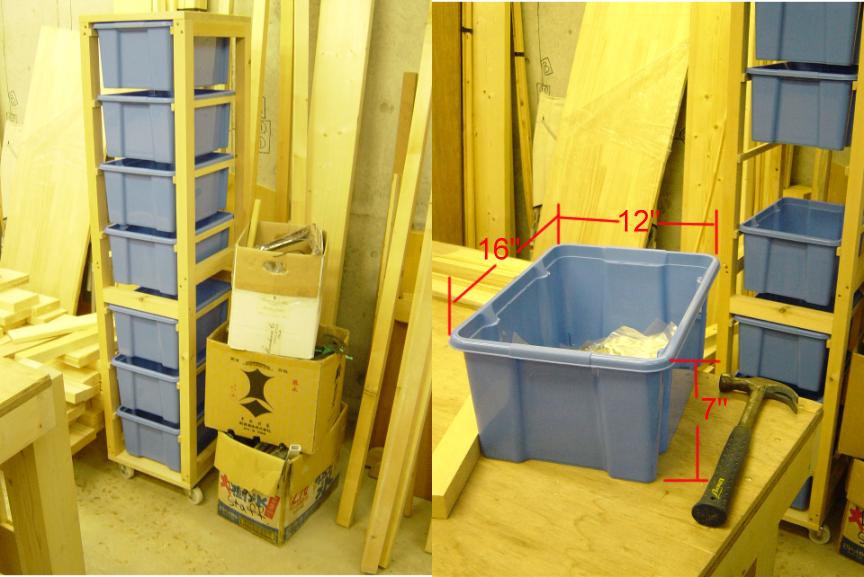
These are a set of storage bins I made. I got really tired of hunting through cardboard boxes of stuff I brought over from the old shop, but I was not ready yet to build my cabinets as I have not had the time to do the walls and floor. The bins cost about 150 yen each, and there are 7 in a stand. The stand is on casters so I can move it about the shop. The bins are 16" x 12" x 7". Cheers! |
 Two things here, first you can see the wood storage rack I finally built, and I moved my SCMS under the new rack, I think this is the best place for it. I want to make a better bench/cabinet for the SCMS, but I have other things that need to be done first, and this set-up while not perfect by a long ways, DOES work. |
 |
Pat Copper's Brother Jack stopped by, nice guy, we took some pics!


Jack in my shop!